Vista NetMail
Netmail electronic mail processing software is suited for both corporate and home use. It provides extensive filtering, processing and recording capabilities for incoming correspondence and requests, creating incoming and outgoing message archives.
Netmail can store information on many e-mail accounts. If you have several external mailboxes at different ISPs you will not need to enter a new password and adjust the settings every time. All you have to do is choose the connection profile through which you want to exchange messages. You can also create different mailboxes for different messages within the program.

Options are also provided for standard e-mail clients: support of attachments, message sorting by date, subject, address or other fields, message searches based on key words, etc.

The software will be useful for both electronic business professionals and all those who can set up a message exchange with existing customers and potential clients on a professional level.
 

Software Operating Procedure.

A User's Manual.

Starting up work with the software

To use the software you will need to make certain initial settings.

Then the software is up and running. Now you will need to enter the parameters without which it will be impossible to send or receive messages. You will need to find out this information from your Internet provider (supplier of Internet services). It is individual to every user.

Following installation the software the database will be located by default in the same directory as the program. You can move it to any other directory and reset the path in the Preferences menu.

After installing and starting the software select Preferences from the Main menu.

The Settings dialog is then displayed.

Netmail can store information on many e-mail accounts. Enter the so-called electronic mail server connection profile fields:

You will need to receive this information from your provider (ISP). It is individual to every user.

You can enter several such profiles into the software. The profile where you place the cursor mark will be the active one where you will be receiving and from which you will be sending messages. In case you need to receive mail at another external mailbox, just add the new profile or select one from the list. Thus, if you need to receive mail from different providers (ISP) you can check it without entering the user's name and password repeatedly by simply placing the cursor mark on the right line.

Options Settings

Then set the following parameters to send and receive mail. Let's start from the top

Attachment directory and database path

Before downloading messages define the path to the directory where you are going to store the attachments. Never open attachments received from unfamiliar sources. First check the directory with the attachments using an anti-virus program before you open the files.

Select the path to the database. You can locate it in any directory on your computer's hard drive. By default the database will be located in the same directory with the mail software.

Show headers

If the "show headers" option is selected, system information will appear in the "view messages" window.

SMTP Identification

In order for outsiders not to be able to use your server the server usually requires authorization before mail is sent. Enter this option if your server requires user identification.

Charset

The program supports various national message codings. This means you'll be able to maintain correspondence in almost any language.

This option is required to select the coding of messages being sent. You will need to select the appropriate coding for various national languages.

Delete messages from the server

If this option is not highlighted then even if you have read messages they will physically stay on the server and not be deleted.

Load headers only

According to our experts the majority of spam mail is deleted by users on the basis of subject of the message. The text of such messages is not even read. Thus, there is no sense in copying such messages from a server to a local computer.

The Netmail system is capable of limiting the size of copied messages and even allows you to copy the message headers alone. If the header of such large messages is of no interest to you it can be deleted from the server without being copied to your computer. If it is the message you are waiting for the software will copy the remaining part of it at your request.

Load only N.. lines from each message

Sometimes messages are too large but you need to read all your mail at once. To be able to do this you can enter a limit on the size of the message and just load the headers first and only then load the selected messages you need to view separately.


The other filter is used for messages already received and allows you to process information received, for example, add data to the address book or automatically prepare replies based on a preset template.

For this use the following options:

The following options help the user to tune useful functions.

Check for mail every __ minute(s)

If you enter a number in this field, NetMail checks your POP server for new mail at regular intervals and transfers any mail addressed to you to your PC.

The number you enter specifies the number of minutes between checks of the POP server. This option only works when NetMail is running.

Keep copies of outgoing mail

If this option is on, a copy of each sent message is kept in the Out mailbox (their summaries are marked with an "S" in the Status column of the Out mailbox window). If this option is off, NetMail moves outgoing messages to the Trash mailbox after they are sent.

Use signature

If this option is on, NetMail automatically attaches your signature to the end of outgoing messages.

File types

On the mime type last page you can set the needed application (program) which is going to open each type of file.
 

Checking For and Receiving Electronic Mail To receive messages: The POP server is the machine where your mail is received and stored until it is transferred to the NetMail program on your PC. Your POP server account is specified in the General setting in the Preferences dialog (Tools / Preferences menu).

If the In mailbox is not already open, select In from the Mailbox menu.

Unread messages are designated by a bullet (.) in the far left column of the message summary. Double-click anywhere on a message summary to open the message. Incoming messages are saved indefinitely in the In mailbox until they are deleted or transferred to another mailbox.

Manual Checking

You may check for mail manually at any time by selecting Check Mail from the File menu.

A Progress window is displayed momentarily at the top of the screen as the POP server is checked. If there is a problem reaching the POP server, an error message alert is displayed. To rectify the problem, review the POP server field in the Preferences dialog for correctness.

If there is no mail waiting at your account on the POP server, the �No New Mail� alert is displayed. Click OK. You may check for mail again later.

If there is new mail, it is transferred automatically from the POP server to NetMail on your PC. A progress window is displayed at the top of your screen allowing you to monitor the mail transfer.

Mail arrives in the In mailbox. Unread messages in the In mailbox are designated by a bullet (.) in the far left column of the message summary. Double-click anywhere on a message summary to open the message. Incoming messages are saved indefinitely in the In mailbox until they are deleted or transferred to another mailbox.

Stopping a Mail Check

If you want to stop a mail check in the middle (because it is taking longer than anticipated), click the Stop button in the progress window.

Viewing Electronic Messages Received Incoming messages land in the inbox or the mailbox determined for them by the filter. You can move the selected messages to another mailbox using the transfer button.

The program provides two options of the message viewing interface. Select the "New Interface" option. Check or uncheck this option.

Mailbox Window

To open a mailbox, select the desired mailbox from the list of mailboxes under the Mailbox menu.

The mailbox window is then displayed.

To view the text of the message double click the mouse on the message. A view window will appear. The sender's address will appear at the top. If the "Preferences" program settings set the "show headers" option systems information will be shown during viewing. If not then this information will not be shown.

Two viewing modes are available:

Html message format has become widespread lately. However, such messages are large and may contain dangerous viruses. Ordinary text messages are more compact and are much more likely to be read by your clients and perspective business clients. Many clients simply do not support this new standard.

Down at the bottom of the window are the attachments. To view press the "Attachments" button. You will see the path to the location of the attachment. The path to the attachment can be set under the program's general settings.

If any messages are stored in the mailbox, they are listed as individual message summaries. Each message summary is divided into six columns: Status (S), Sender (Who), Date, Size (K), and Subject.

Message Summary Columns

Each message summary is divided into six columns: Status (S), Size (K), Who (Sender/Recipient), When (Date - Time), and Subject.

The Status column displays the message status, which is one of the following:
.       The message has not been read (all mailboxes except Out), or is queueable but has not been queued (Out mailbox only).
<blank>     The message has been read (all mailboxes except Out), or is not yet able to be queued because it has no  recipients (Out mailbox only).
R               Reply has been chosen for the message.

S               The message has been sent (outgoing messages only).

  The "Who" column shows the sender of the message (for incoming messages) or the recipient or intended recipient (for outgoing messages).

The "When" column displays the date and time the message was sent, or, for timed messages, the date and time the message is scheduled to be sent.

The "Subject" column displays the subject of the message. The sender originally typed this information into the message header, but it can be modified by you (see the "Editing Message Subjects" section).

Sorting Messages Within Mailboxes

It is possible to sort the message summaries in a mailbox window according to the contents of any of the message summary columns. To do this, first open the mailbox to be sorted, then select the appropriate command from the Sort submenu under the Edit menu. The messages are sorted when the mouse button is released. NetMail sorts in ascending order; the smallest item first.

Reply. Answering a message Select any message and press the "Reply" button. A new message window will appear with the text of the previous message.

The original sender's address automatically placed in the To: field of the header. The original sender's text is also automatically included at the beginning of the reply message (prefixed by ">" at the beginning of each line). This text may be edited or deleted as needed. Additional text may be entered into the reply just as in any outgoing message. The reply can then be saved for further changes, or simply sent.

An incoming message for which the Reply command has been used is identified by an "R" in its message summary.

Forward. Transferring messages to a different mailbox Messages may be transferred between any two mailboxes. For any current message, select the mailbox to which the message should be transferred from the Transfer menu. The message is transferred from its previous location to the selected mailbox.

Highlight the message with the following keys:

Press the "Transfer" button and select the mailbox to which you want to transfer the message. Deleting a message A message can be deleted both inside the program and on the server with the help of the corresponding keys and menu items. For any current message, choose Delete from the Message menu. After being deleted in the program the messages first go to the Trash Box. The Trash Box can be emptied with the "Delete All" button. Creating New Messages. Sending Electronic Mail. To send a new outgoing message select the "New Message" from the File menu.
A new message window will appear.

An outgoing message is a message you send to someone else. A message consists of two parts: the message header and the body of the message. The first part contains the subject of the message, the recipient's address, the date and other system fields.

The body of the message contains both the text and the coded attachments to the letter. They can be either files, programs or html documents.

Message Header

Outgoing message headers consist of fields: To, Subject, Cc, Bcc and Attachments.

Type the electronic address to which you want to send the message in the "To" field. There are also two additional fields to type in the "bcc" blind copy address and the "cc" ordinary copy address. In the case of bcc you need to send the letter to several addresses at the same time. Just enter the addresses in a sequence, separated by a comma. The recipients will only see the address of the first recipient. As a rule providers limit the use of this sending method to 10-20 addresses.

To move the insertion point from field to field, press the [tab] key or click in the desired field with the mouse. When entering information into the fields, you can use the standard Windows text-editing tools provided under the Edit menu.

Here is a brief description of the intended contents of each field:

To:

The intended recipient's e-mail address, or a mailing list you have. Multiple addresses are allowed, but must be separated by commas.

Cc:

The e-mail address of the person to whom a copy of the message is to be sent. Multiple addresses are allowed but must be separated by commas. This field may be left blank.

Bcc:

"Blind" carbon copy. Like addresses listed in the Cc: field, addresses listed here receive copies of the message. Unlike addresses listed in the Cc: field, addresses listed here do not appear in the message header of the recipients. This is useful when you want to send a copy of a message to someone without everyone else knowing you did so. Multiple addresses are allowed but must be separated by commas. This field can be left blank.

Subject:

Type in the subject of your message.

Brief text indicating the contents of the message. This field can be left blank.

Message Text (Message Body)

After filling in the fields, move the insertion point to the space below the message header.

Message text - you can enter it in standard text format or html format. Select the text or html message format. Be careful, it is highly recommended to use the most basic format and attach complex letters to the message since many users may not have software capable of supporting html. The text message is typed into the text window.

Attachments: List of documents being sent along with the message.

Any file can be attached to and sent with a NetMail message.

An attachment can be added by pressing the "Attach" button in the lower part of the screen.
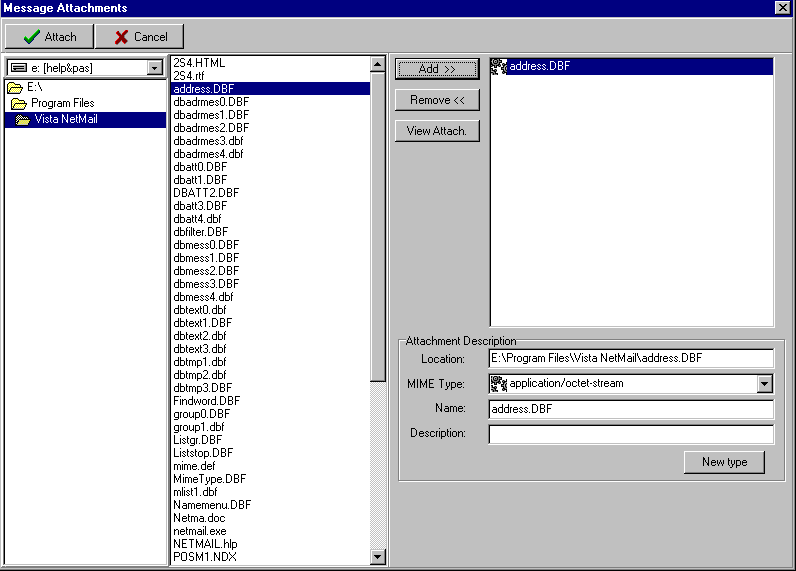
The Attach file dialog is displayed. Once the desired file is located, select it and click on the OK button to attach the file to the message.

Several attachments can be added to a single letter. After that press the "Save" button. Then press the "Send" button. The message will be sent and saved in the outbox.

Saving an Outgoing Message for Later Changes

Sometimes it is convenient to save an outgoing message either as a safeguard when typing long messages, or so you can return to it later to edit or add more text.

The outbox can be accessed through the mailbox menu item. All messages sent can be viewed in this mailbox.

A message can be created and saved without sending it right away. To save the message while the outgoing message window is open, select Save from the File menu. In the future it can be opened and edited. Only unsent messages can be edited. Sent messages are not subject to editing. However, you can use the "Send Again" button and the software will create an exact copy of the selected message, which you will be able to edit.

Address book - The program's address book contains information about your recipients or mailing list.

Sending a message Select a message and press the "Send" button or Select Send Immediately from the File menu to immediately send a current message. A message sending dialog box will appear. You will only be able to send an unsent message. Sent messages will need to be created again using the "Send Again" button. Many servers require identification, so before sending mail you will need to check mail with the help of the "Check Mail" menu item and use the special "Preferences" option. Address book. The program's address books are a set of .dbf format files. Each file contains information about one book or mailing list. The same address may be contained in several different address books. You can create a new address book, edit or delete an existing book. Use the upper panel for this. For a newly created address book a file will be created with its name shown at the bottom. Having selected the needed address book for editing you will get the list of addresses in it on the screen.

There are two modes for viewing: form mode and table mode. Data can be entered and edited only in form mode. In this mode a number of fields will be shown which may be needed to record data on the addressee.

To enter data into the fields press "^" to edit, "+" to add and "-" to delete. After you finish entering data press arrow to save it and "cross" to delete it.

Any addresses which have been entered can be added to another address book. To do this highlight the address in the table view mode and select from the name of the list where you want the address to be saved then press the "Add" button.

Otherwise you can save them as a new address book. To do this press "Save As".

A filter can be used to search for and select addresses. Press the filter button and type in the parameters. The filter can be set for a complete match or for content of a value. After the filter is applied only addresses that fit its parameters will be shown. To remove the filter you will need either to press the filter button again and clear all the parameters or close the form and open it again.

Finding Text Within Messages and Mailbox. NetMail incorporates a Find function that searches for specific text within a single message, and multiple messages for selected mailboxes. To display the Find submenu of commands, select Find from the Edit menu.

Finding Text Within One Message

To search for text within a single message, open the message and make sure it is current. Then, select Find from the Edit menu and select the Find command from the submenu. The Find dialog is displayed, with the blinking insertion point located in the text field.

Type the text you want to find in the text field. When finished entering the desired text, click the Find button.

Starting at the beginning of the open message, NetMail searches the current message for the specified text. If no match is found, the not found alert is displayed.

To continue searching in the same message for the next occurrence of the text, click the Find button in the Find dialog, or select the Find Again (F3) command from the Edit menu. These commands are equivalent and limit the search to the same message. Repeating these commands cycles through the matches in the open message only.
 

Filters and message processing. In the previous section we described address book filters. The software also has filters against external messages.

Netmail allows automatic sorting of incoming messages based on preset criteria and their placement in individual folders or mailboxes where they can be viewed at a later time. In such a system only those folders can be viewed, for example, where only the most important messages are directed. The mail filter processes incoming messages based on header fields, for example, using the sender's address or the content of the Subject field. Advanced filters can be applied both to any field of the message header or the body of the message itself.

The options can be set in such a way that they will work after each message is received. The filter can also be used manually. Use the "Add", "Delete" or "Edit" rules.

Then indicate which word the message subject field should contain or an address to filter messages. By filtering, a message can be moved to a specified mailbox.

You can filter data depending on the subject of the message and text, contained in it.

You can consistently impose different filters on the same mailbox.

The following actions are available:

 
You can also process the text of the message to process fields, e.g. if there is a form to complete on the Internet so that the completed fields get put into your address book database automatically.

A field identification algorithm can be specified in a special setting mode.

The rule may be temporarily blocked. The rule can be used by pressing the "Apply" or "Apply This" button. The progress bar will reflect performance process.

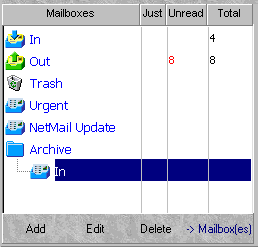
Mailboxes. Editing mailbox titles. Mailboxes and mail folders provide a structured way for NetMail users to organize received messages. The Mailboxes window allows you to create new mailboxes and folders and to remove and rename them. You may also want to move mailboxes and folders from one folder to another one.

Clicking on any of the mailboxes in a list opens that mailbox window on the screen. Individual messages can be selected, opened, and otherwise manipulated from there.

By default the program contains only three mailboxes:

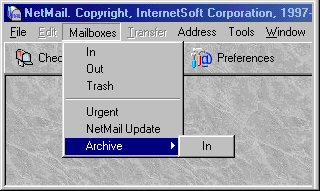
The names assigned to mailboxes can be edited in the program, i.e. you can delete or move them, etc. The list of entered mailboxes is shown in the main menu.

When you select a mailbox from the main menu it will show the list of messages corresponding to that mailbox.

Creating a Mailbox

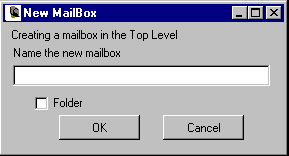
To create a new mailbox, select New... from the Mailbox menu. The New Mailbox Dialog is displayed.

Type in the new mailbox name and click OK. The mailbox is created and added to the Mailbox and Transfer menus.

You can also create mailboxes using the Mailboxes window under the Tools menu

Creating a Mail Folder

NetMail allows you to create mail folders in which you may keep one or more mailboxes and even other subfolders that hold additional mailboxes. In other words, not only can mailboxes be organized into folders, but folders can be contained one within another.

To create a new mail folder, select New... from the Mailbox menu. The New Mailbox Dialog is displayed. Type the name of the new mail folder and check the Make it a Folder option. Click OK to create the folder.

Creating a Mailbox Within a Folder

To create a new mailbox within a particular folder, select that folder from under the Mailbox menu and choose New... from the submenu that is displayed. The New Mailbox Dialog is displayed. Type in the new mailbox name and click OK. The mailbox is created and added to the Mailbox and Transfer menus. You can also create subfolders in the same manner. Just check the Make it a Folder option.

NetMail Menu Commands File
This menu provides basic file and mail program functions.

New Message
Open new message composition window.

Reply
Reply to the sender of the current message.

Send Again
Resend a message rejected by the mail system. Be sure to fix whatever caused the problem before you queue the message.

Send Immediately
Save the message in the Out mailbox and send it immediately.

Send Queued Messages
Send all messages that have been queued for delivery.

Check Mail
Pick up new mail from the POP server. The time in parentheses (if displayed) indicates the next time NetMail will automatically check for mail.

Attach File...
Attach file(s) to the current message.

Close
Close the current window.

Save
Save changes to the contents of the topmost window. This applies to composition windows

Delete
Transfer the current message to the Trash mailbox; also used for deleting messages from the Trash mailbox.

Print
Print the current message(s).

Exit
Exit the NetMail application.

Edit
This menu provides text editing and sorting tools.

Undo
Reverse the last editing action performed on a piece of text.

Cut
Delete selected text and place it on the clipboard.

Copy
Copy selected text and place it on the clipboard.

Paste
Place contents of clipboard at insertion point.

Clear
Delete selected text.

Select All
Select entire contents of message or mailbox.

Find
Search for designated text or character string within message(s).

Sort submenu
Sorts message summaries in a mailbox. Hold down the [Shift] key to reverse the order of the sort.

Mailbox
This menu lets you open a mailbox, or bring an open mailbox to the front.

In
Open mailbox where incoming messages are stored until deleted or transferred to another mailbox.

Out
Open mailbox where messages you compose are stored, and where queued messages are held until actually sent, and where copies of sent messages may be initially stored.

New...
Display New Mailbox dialog to create a new mailbox.

[Your Mailboxes]
Mailboxes you create are also displayed in this menu.

Transfer
This menu lets you transfer current message(s) to the selected mailbox.

Trash
Transfer the current message(s) to the Trash mailbox.
 

WARRANTY DISCLAIMER THE SOFTWARE IS PROVIDED AS IS WITHOUT WARRANTY OF ANY KIND. TO THE MAXIMUM EXTENT PERMITTED BY APPLICABLE LAW, VISTA FURTHER DISCLAIMS ALL WARRANTIES, INCLUDING WITHOUT LIMITATION ANY IMPLIED WARRANTIES OF MERCHANTABILITY, FITNESS FOR A PARTICULAR PURPOSE, AND NONINFRINGEMENT. THE ENTIRE RISK ARISING OUT OF THE USE OR PERFORMANCE OF THE PRODUCT AND DOCUMENTATION REMAINS WITH THE RECIPIENT. TO THE MAXIMUM EXTENT PERMITTED BY APPLICABLE LAW, IN NO EVENT SHALL VISTA BE LIABLE FOR ANY CONSEQUENTIAL, INCIDENTAL, DIRECT, INDIRECT, SPECIAL, PUNITIVE, OR OTHER DAMAGES WHATSOEVER (INCLUDING, WITHOUT LIMITATION, DAMAGES FOR LOSS OF BUSINESS PROFITS, BUSINESS INTERRUPTION, LOSS OF BUSINESS INFORMATION, OR OTHER PECUNIARY LOSS) ARISING OUT OF THIS AGREEMENT OR THE USE OF OR INABILITY TO USE THE PRODUCT, EVEN IF HAS BEEN ADVISED OF THE POSSIBILITY OF SUCH DAMAGES.